一般来说无状态服务有利于服务横向扩容,但是现实中很难做到服务完全无状态化,像数据库、缓存等这些服务数据需要持久化,一定是有状态的,要想让这些服务也能运行在Kubernetes集群中就必须先解决数据持久化问题。如果你的Kubernetes集群是运行在AWS、阿里云等公有云上这个问题很好解决,直接使用云厂商提供的EBS等弹性云存储就行,但如果是运行在私有云上就需要自建分布存储。
Ceph是一个兼具良好性能、可靠性和可扩展性的分布式存储系统,它支持的块存储类型具有较好的性能,且kernel自带rbd模块,很适合拿来做为kubernetes的后端持久化存储。但是Ceph学习曲线陡峭,想要快速搭建一套集群不是很容易,运维成本也比较高,所以才催生出了Rook这样的项目,来简化Ceph的搭建和维护成本。
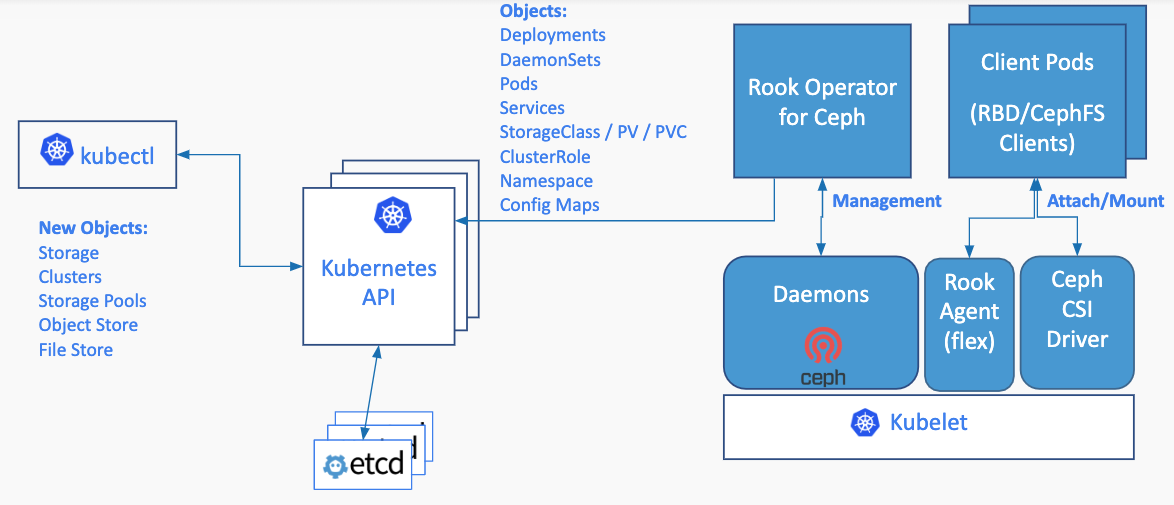
Rook 由最开始的只专注Ceph的编排工具发展成现在支持多种存储方案的一个开源的云原生存储编排平台,提供对各种存储方案的编排支持,以方便和云原生环境进行本地集成。 Rook通过自动化部署、启动、配置、供应、扩展、升级、迁移、灾难恢复、监控和资源管理来将存储软件转变成能实现自我管理、自我扩展和自我修复的存储服务,降低使用门槛。
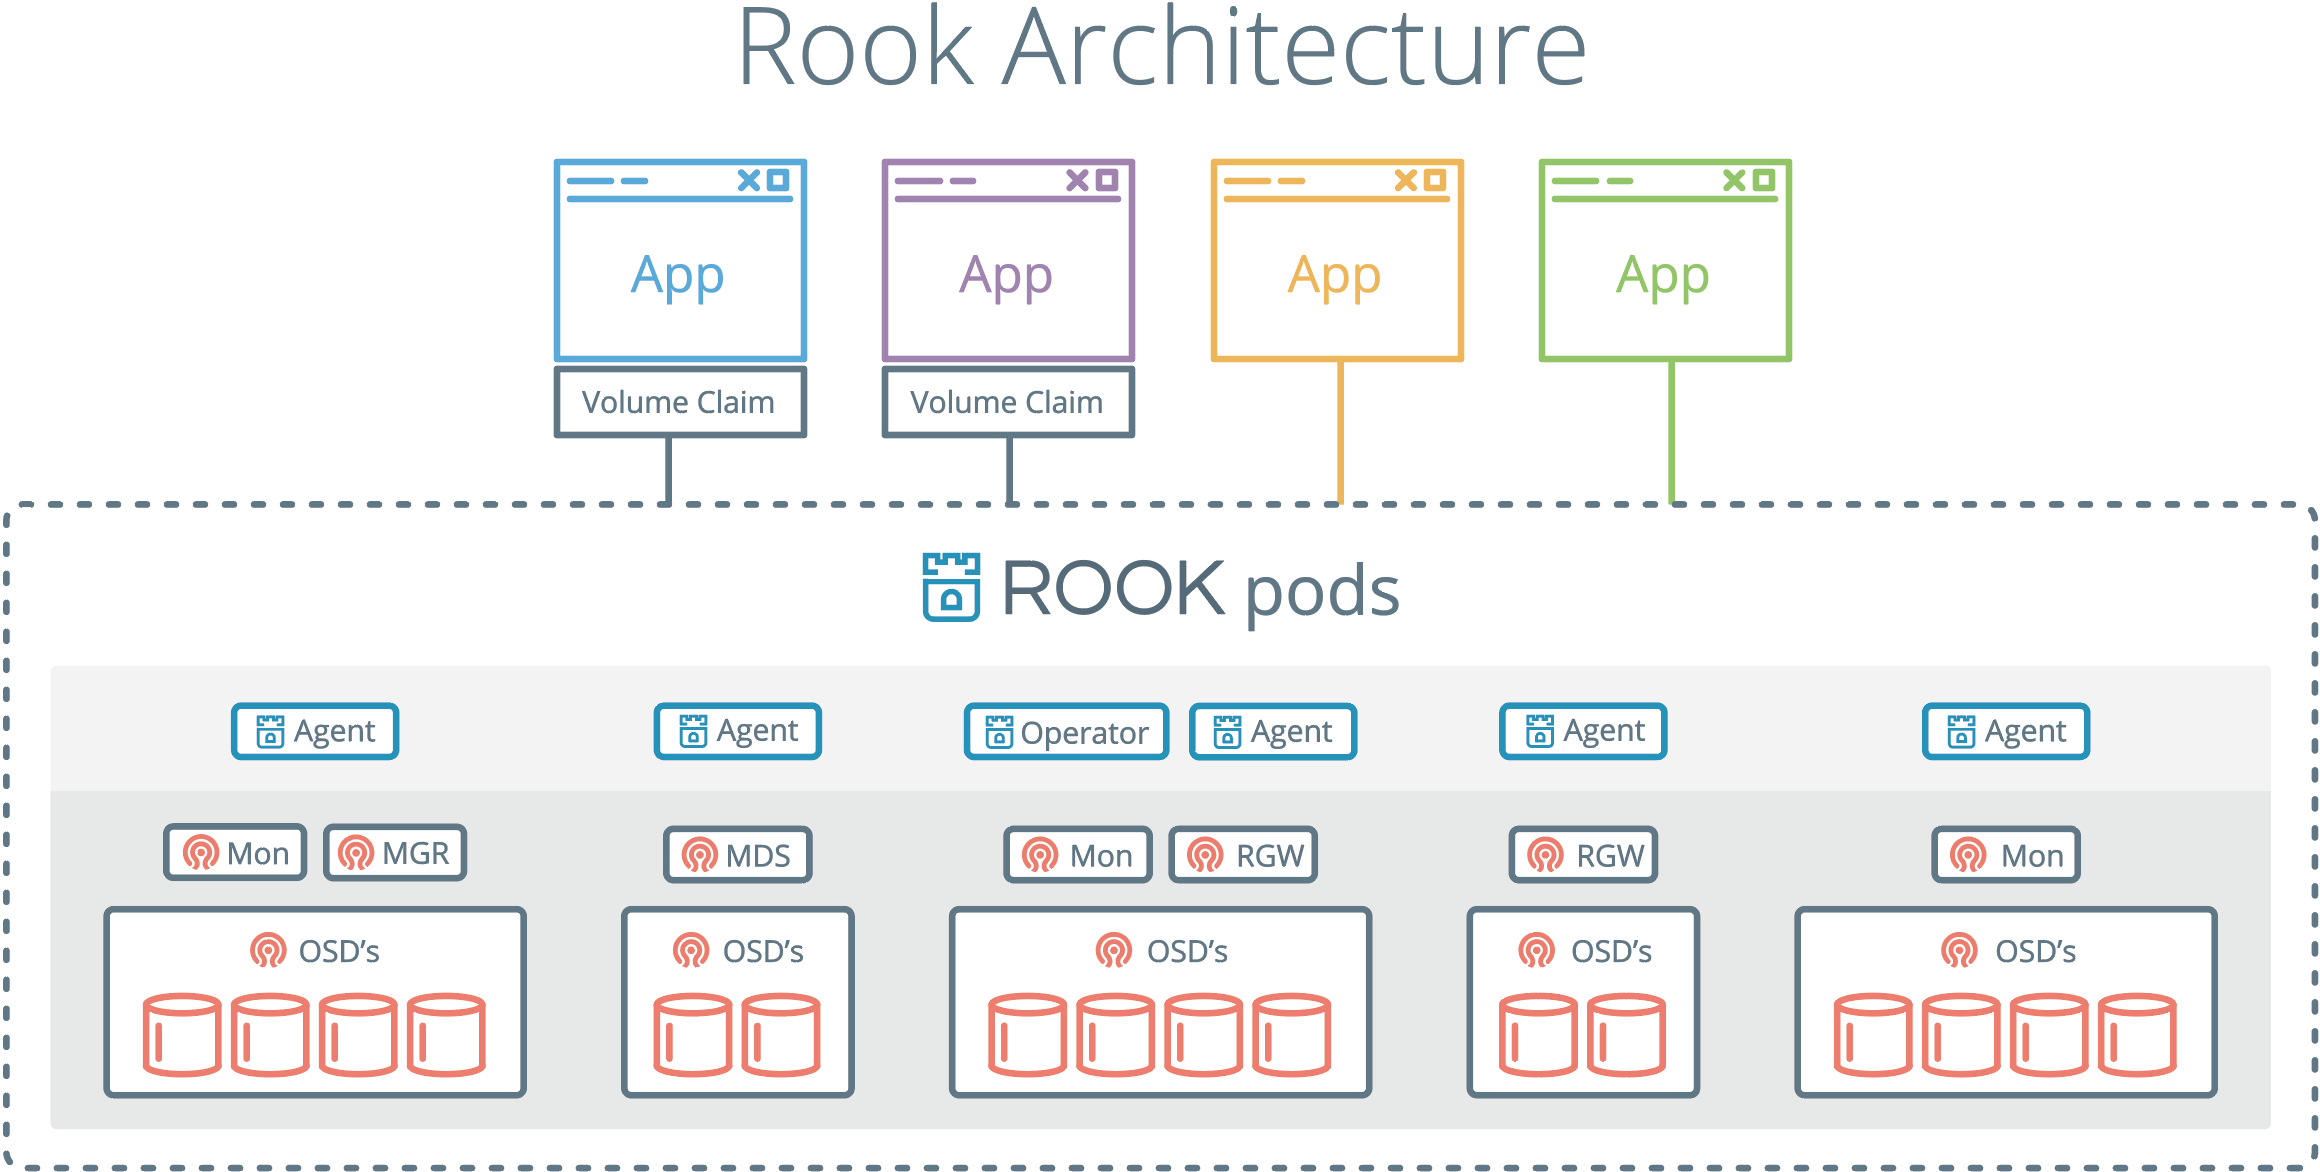
Rook架构
环境准备
Kubernetes 集群
1
2
3
4
5
6
7
8
|
➜  ~ kubectl get nodes
NAME      STATUS   ROLES    AGE   VERSION
kadm01    Ready    master   13d   v1.15.5
kadm02    Ready    master   13d   v1.15.5
kadm03    Ready    master   13d   v1.15.5
knode01   Ready    node     13d   v1.15.5
knode02   Ready    node     13d   v1.15.5
knode03   Ready    node     13d   v1.15.5
|
部署Rook Operator
创建CRD
kubectl apply -f https://raw.githubusercontent.com/rook/rook/release-1.1/cluster/examples/kubernetes/ceph/common.yaml
 1
 2
 3
 4
 5
 6
 7
 8
 9
10
11
|
➜  ~ kubectl apply -f https://raw.githubusercontent.com/rook/rook/release-1.1/cluster/examples/kubernetes/ceph/common.yaml
namespace/rook-ceph created
customresourcedefinition.apiextensions.k8s.io/cephclusters.ceph.rook.io created
customresourcedefinition.apiextensions.k8s.io/cephfilesystems.ceph.rook.io created
customresourcedefinition.apiextensions.k8s.io/cephnfses.ceph.rook.io created
customresourcedefinition.apiextensions.k8s.io/cephobjectstores.ceph.rook.io created
customresourcedefinition.apiextensions.k8s.io/cephobjectstoreusers.ceph.rook.io created
customresourcedefinition.apiextensions.k8s.io/cephblockpools.ceph.rook.io created
customresourcedefinition.apiextensions.k8s.io/volumes.rook.io created
customresourcedefinition.apiextensions.k8s.io/objectbuckets.objectbucket.io created
...
|
验证CRD
1
2
3
4
5
6
7
|
➜  ~ kubectl api-resources|grep ceph.rook.io
cephblockpools                                 ceph.rook.io                   true         CephBlockPool
cephclusters                                   ceph.rook.io                   true         CephCluster
cephfilesystems                                ceph.rook.io                   true         CephFilesystem
cephnfses                         nfs          ceph.rook.io                   true         CephNFS
cephobjectstores                               ceph.rook.io                   true         CephObjectStore
cephobjectstoreusers                           ceph.rook.io                   true         CephObjectStoreUser
|
部署Rook Ceph Operator
kubectl apply -f https://raw.githubusercontent.com/rook/rook/release-1.1/cluster/examples/kubernetes/ceph/operator.yaml
1
2
|
➜  ~ kubectl apply -f https://raw.githubusercontent.com/rook/rook/release-1.1/cluster/examples/kubernetes/ceph/operator.yaml
deployment.apps/rook-ceph-operator created
|
验证rook-ceph-operator是否已正常启动
1
2
3
4
5
6
|
➜  ~ kubectl -n rook-ceph get pod -o wide
NAME                                  READY   STATUS    RESTARTS   AGE     IP            NODE      NOMINATED NODE   READINESS GATES
rook-ceph-operator-55555bcbbc-4s9d5   1/1     Running   0          5m44s   10.1.176.3    knode03   <none>           <none>
rook-discover-95w8g                   1/1     Running   0          3m31s   10.1.176.4    knode03   <none>           <none>
rook-discover-cttrt                   1/1     Running   0          3m31s   10.1.32.67    knode02   <none>           <none>
rook-discover-vqh5w                   1/1     Running   0          3m31s   10.1.25.134   knode01   <none>           <none>
|
Rook-Ceph支持自动发现机器上的硬盘,其中rook-discoverpod就是用来自动发现的,它以 daemonsets的方式启动。
创建Rook Ceph集群
准备YAML文件
vim cluster-test.yaml
 1
 2
 3
 4
 5
 6
 7
 8
 9
10
11
12
13
14
15
16
17
18
19
20
|
apiVersion: ceph.rook.io/v1
kind: CephCluster
metadata:
  name: rook-ceph
  namespace: rook-ceph
spec:
  cephVersion:
    # 通过https://hub.docker.com/r/ceph/ceph/tags获取最新的image
    image: ceph/ceph:v14.2.5-20191210
  dataDirHostPath: /var/lib/rook
  mon:
    count: 2
  dashboard:
    enabled: true
  storage:
    useAllNodes: true
    useAllDevices: false
    #注意:这里只是为了测试简单使用宿主机上的一个目录,正式环境应该使用独立的硬盘。
    directories:
    - path: /var/lib/rook
|
创建集群
1
2
|
➜  ~ kubectl apply -f cluster-test.yaml
cephcluster.ceph.rook.io/rook-ceph created
|
验证rook-ceph集群状态
 1
 2
 3
 4
 5
 6
 7
 8
 9
10
11
12
13
14
15
16
17
18
19
20
21
22
23
24
25
26
|
➜  ~ kubectl -n rook-ceph get pods
NAME                                            READY   STATUS      RESTARTS   AGE
csi-cephfsplugin-kjt6v                          3/3     Running     0          6m59s
csi-cephfsplugin-md2nb                          3/3     Running     0          6m59s
csi-cephfsplugin-provisioner-77c8984f56-hnpl6   4/4     Running     0          6m59s
csi-cephfsplugin-provisioner-77c8984f56-qmv6j   4/4     Running     0          6m59s
csi-cephfsplugin-wcf2n                          3/3     Running     0          6m59s
csi-rbdplugin-j9bgl                             3/3     Running     0          6m59s
csi-rbdplugin-j9x9s                             3/3     Running     0          6m59s
csi-rbdplugin-provisioner-5b9b9bf54b-lcwff      5/5     Running     0          6m59s
csi-rbdplugin-provisioner-5b9b9bf54b-p5t8x      5/5     Running     0          6m59s
csi-rbdplugin-rqnlp                             3/3     Running     0          6m59s
rook-ceph-mgr-a-8d5f9cc7c-9bk9s                 1/1     Running     0          91s
rook-ceph-mon-a-69cccd97f9-2v9nn                1/1     Running     0          4m43s
rook-ceph-mon-b-d65bd5d7c-npp29                 1/1     Running     0          4m28s
rook-ceph-mon-c-7b6f7cb594-rkkcz                1/1     Running     0          3m
rook-ceph-operator-55555bcbbc-cln85             1/1     Running     8          29m
rook-ceph-osd-0-6b5548cd98-hlwml                1/1     Running     0          61s
rook-ceph-osd-1-74f7779cf5-hp9ct                1/1     Running     0          60s
rook-ceph-osd-2-7d44c6888b-v59ph                1/1     Running     0          60s
rook-ceph-osd-prepare-knode01-s5r7j             0/1     Completed   0          67s
rook-ceph-osd-prepare-knode02-49dfl             0/1     Completed   0          67s
rook-ceph-osd-prepare-knode03-wt5wc             0/1     Completed   0          67s
rook-discover-95w8g                             1/1     Running     1          55m
rook-discover-cttrt                             1/1     Running     2          55m
rook-discover-vqh5w                             1/1     Running     13         55m
|
Rook Toolbox 工具包用来调试集群。
部署
1
2
|
➜  ~ kubectl apply -f https://raw.githubusercontent.com/rook/rook/release-1.1/cluster/examples/kubernetes/ceph/toolbox.yaml
deployment.apps/rook-ceph-tools created
|
验证Pod是否已经正常启动
1
2
3
|
➜  ~ kubectl -n rook-ceph get pod -l "app=rook-ceph-tools"
NAME                               READY   STATUS    RESTARTS   AGE
rook-ceph-tools-659c9c588d-4vjln   1/1     Running   0          59s
|
使用Toolbox查看ceph集群状态
kubectl -n rook-ceph exec $(kubectl -n rook-ceph get pod -l "app=rook-ceph-tools" -o jsonpath='{.items[0].metadata.name}') -- ceph status
 1
 2
 3
 4
 5
 6
 7
 8
 9
10
11
12
13
14
15
|
➜  ~ kubectl -n rook-ceph exec  $(kubectl -n rook-ceph get pod -l "app=rook-ceph-tools" -o jsonpath='{.items[0].metadata.name}') -- ceph status
  cluster:
    id:     27bd56bf-ea04-4a35-ad26-77de9cf9b060
    health: HEALTH_OK

  services:
    mon: 3 daemons, quorum a,b,c (age 7m)
    mgr: a(active, since 6m)
    osd: 3 osds: 3 up (since 6m), 3 in (since 6m)

  data:
    pools:   0 pools, 0 pgs
    objects: 0 objects, 0 B
    usage:   32 GiB used, 206 GiB / 238 GiB avail
    pgs:
|
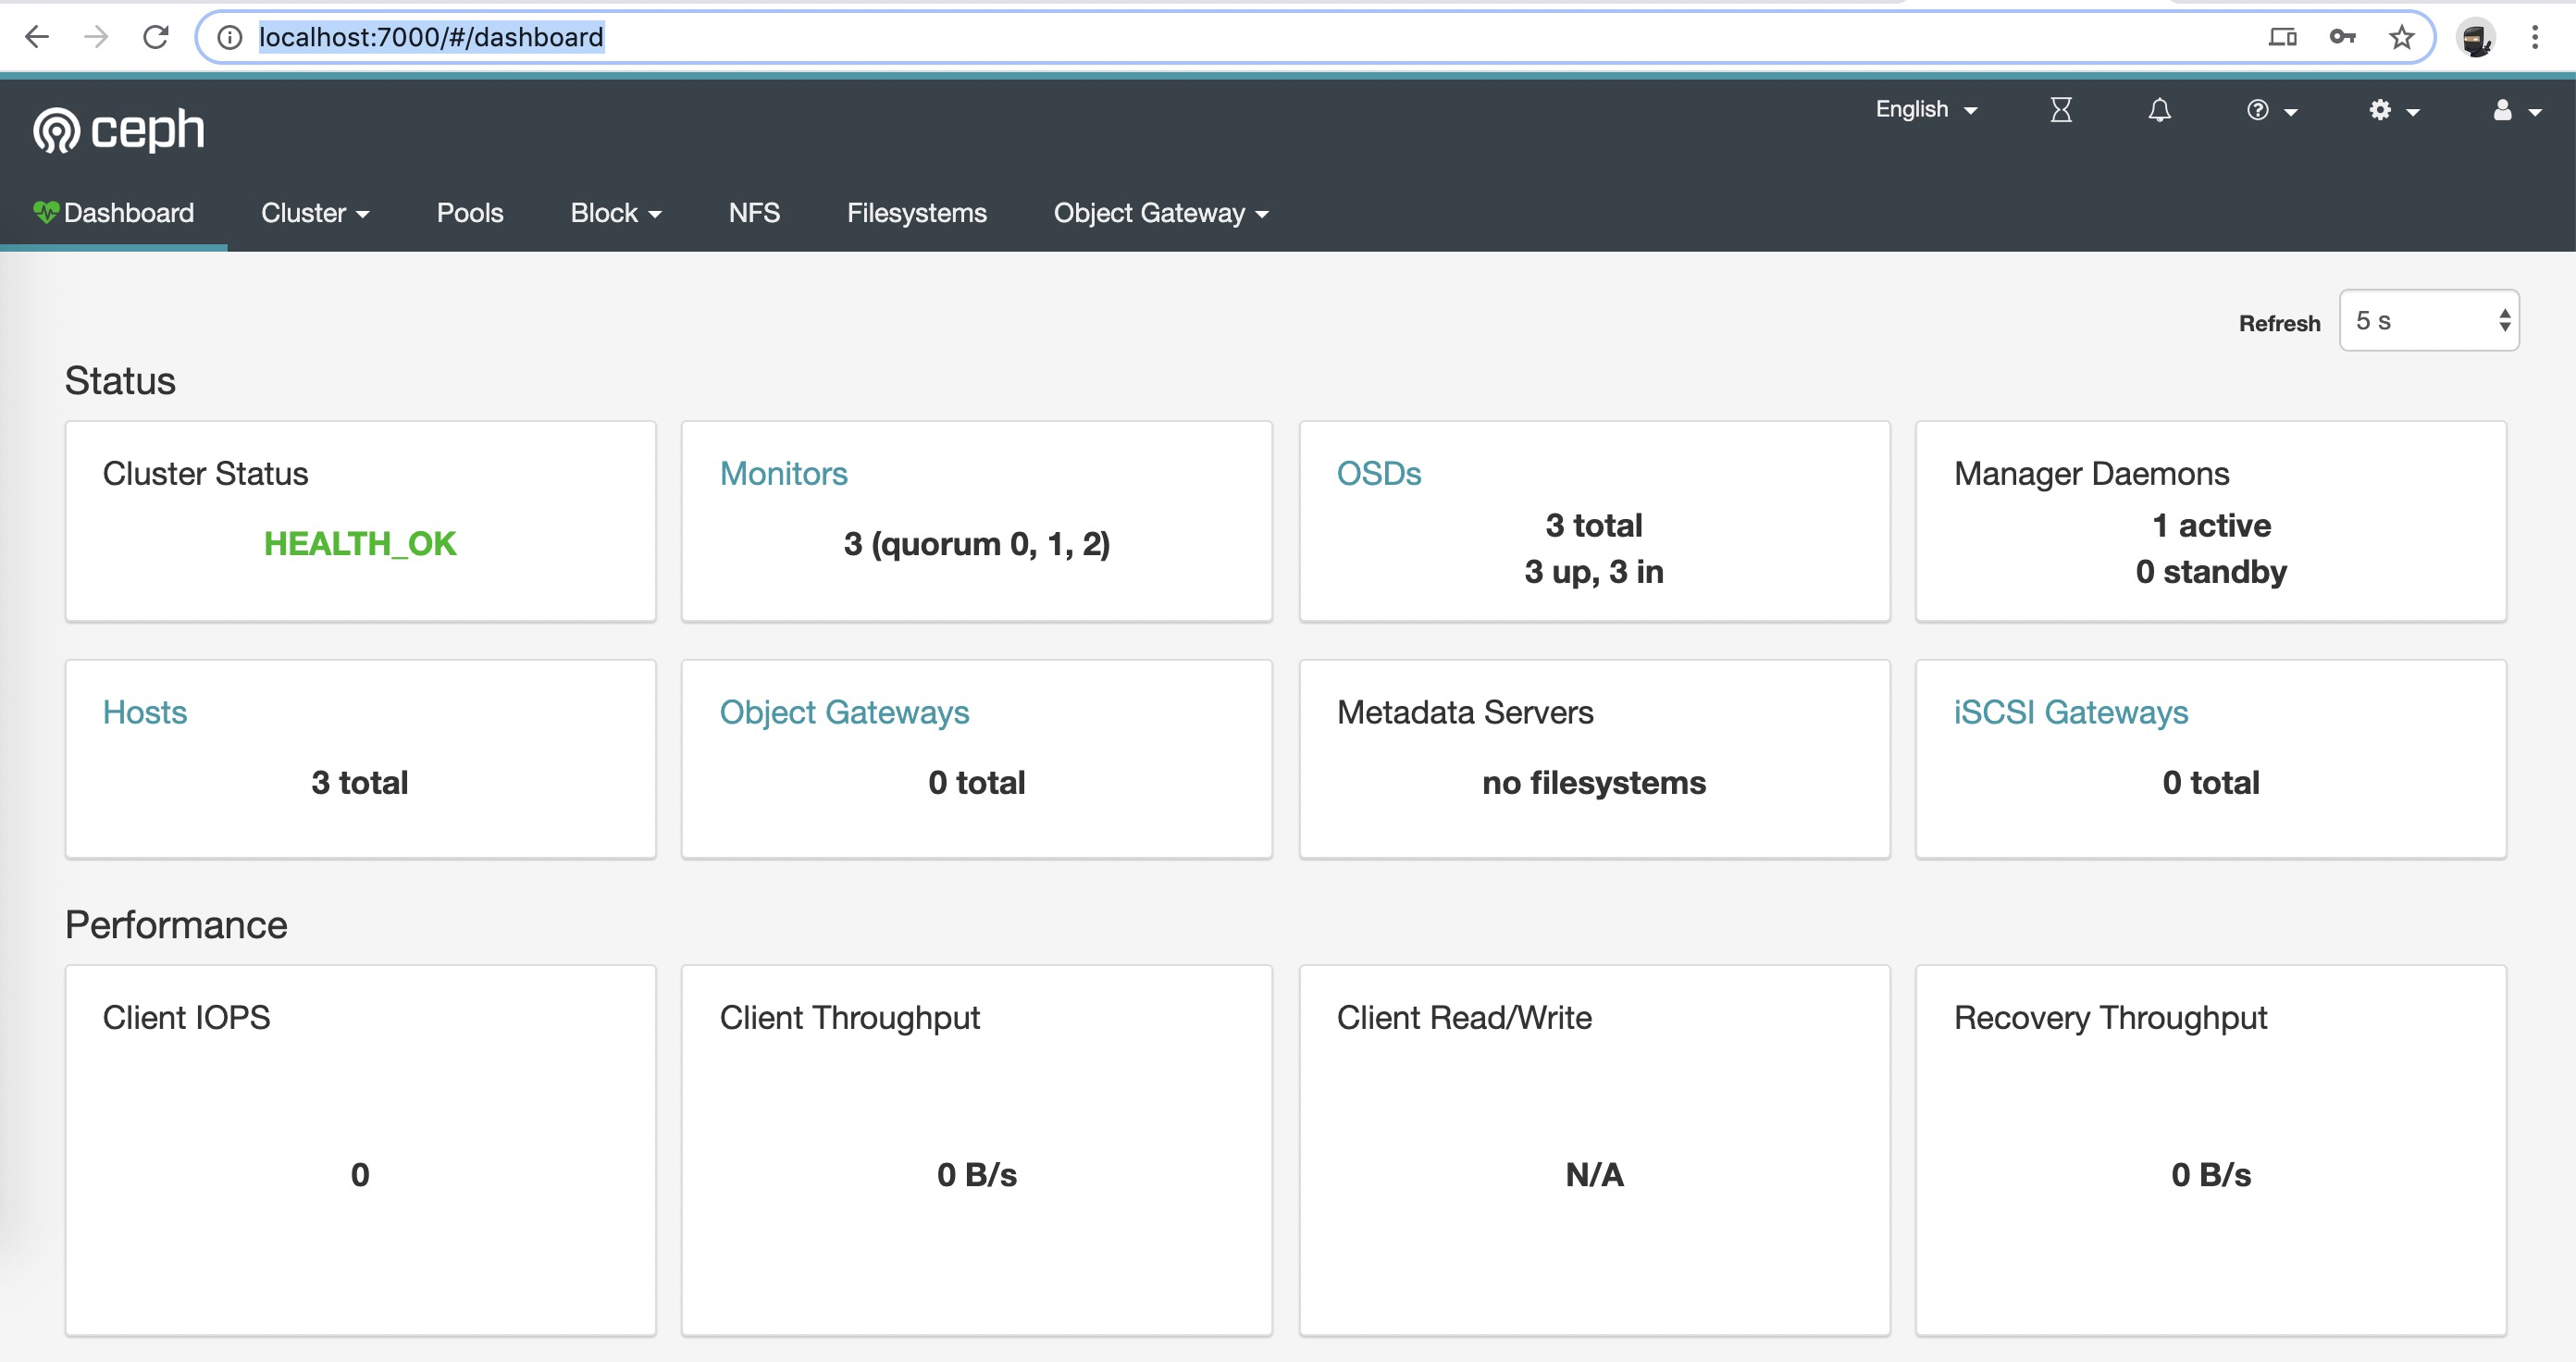
Dashboard
除了通过命令查看集群状态外,Ceph还提了一个dashboard,可以很方便的查看集群各种状态和信息。
开启Ceph Dashboard
dashboard开启需要在ceph集群CRD配置文件中加上
1
2
3
|
  spec:
    dashboard:
      enabled: true
|
由于我们在上边的集群创建过程中已经将dashboard设置为启用状态,所以这里我们可以看到已经expose了相关服务。
1
2
3
|
➜  ~ kubectl -n rook-ceph get svc rook-ceph-mgr-dashboard
NAME                      TYPE        CLUSTER-IP   EXTERNAL-IP   PORT(S)    AGE
rook-ceph-mgr-dashboard   ClusterIP   10.254.5.6   <none>        7000/TCP   9m1s
|
访问Dashboard
Dashboard访问可以通过Ingress或者kubectl端口转发的方式,这里为了简单使用端口转发的方式。
1
2
3
|
➜  ~ kubectl port-forward svc/rook-ceph-mgr-dashboard 7000
Forwarding from 127.0.0.1:7000 -> 7000
Forwarding from [::1]:7000 -> 7000
|
使用浏览器访问本地7000端口
默认用户名:admin,
登陆密码:使用过下边命令获取
1
2
|
➜  ~ kubectl -n rook-ceph get secret rook-ceph-dashboard-password -o jsonpath="{['data']['password']}" | base64 --decode && echo
j73d608vog
|
测试动态PV
现在集群已经搭建起来了,接下我们来测试下能不能使用它作为kubernetes的volume,毕竟这才是我们最关注的。
创建Storage Class
vim sc.yaml
 1
 2
 3
 4
 5
 6
 7
 8
 9
10
11
12
13
14
15
16
17
18
19
20
21
22
23
24
25
26
27
28
29
30
31
32
33
34
35
36
37
38
39
40
41
|
apiVersion: ceph.rook.io/v1
kind: CephBlockPool
metadata:
  name: replicapool
  namespace: rook-ceph
spec:
  failureDomain: host
  replicated:
    size: 2
---
apiVersion: storage.k8s.io/v1
kind: StorageClass
metadata:
   name: rook-ceph-block
provisioner: rook-ceph.rbd.csi.ceph.com
parameters:
    # clusterID is the namespace where the rook cluster is running
    # If you change this namespace, also change the namespace below where the secret namespaces are defined
    clusterID: rook-ceph

    # Ceph pool into which the RBD image shall be created
    pool: replicapool

    # RBD image format. Defaults to "2".
    imageFormat: "2"

    # RBD image features. Available for imageFormat: "2". CSI RBD currently supports only `layering` feature.
    imageFeatures: layering

    # The secrets contain Ceph admin credentials. These are generated automatically by the operator
    # in the same namespace as the cluster.
    csi.storage.k8s.io/provisioner-secret-name: rook-csi-rbd-provisioner
    csi.storage.k8s.io/provisioner-secret-namespace: rook-ceph
    csi.storage.k8s.io/node-stage-secret-name: rook-csi-rbd-node
    csi.storage.k8s.io/node-stage-secret-namespace: rook-ceph
    # Specify the filesystem type of the volume. If not specified, csi-provisioner
    # will set default as `ext4`.
    csi.storage.k8s.io/fstype: ext4
# uncomment the following to use rbd-nbd as mounter on supported nodes
#mounter: rbd-nbd
reclaimPolicy: Delete
|
创建sc
1
2
3
|
➜  ~ kubectl create -f sc.yaml
cephblockpool.ceph.rook.io/replicapool created
storageclass.storage.k8s.io/rook-ceph-block created
|
验证sc
1
2
3
|
➜  ~ kubectl get sc
NAME              PROVISIONER                  AGE
rook-ceph-block   rook-ceph.rbd.csi.ceph.com   7s
|
创建pv
kubectl create -f pvc.yaml
 1
 2
 3
 4
 5
 6
 7
 8
 9
10
11
|
apiVersion: v1
kind: PersistentVolumeClaim
metadata:
  name: rbd-pvc
spec:
  accessModes:
  - ReadWriteOnce
  resources:
    requests:
      storage: 1Gi
  storageClassName: rook-ceph-block
|
创建测试pod
kubectl create -f demo-pod.yaml
 1
 2
 3
 4
 5
 6
 7
 8
 9
10
11
12
13
14
15
16
|
apiVersion: v1
kind: Pod
metadata:
  name: rbd-demo-pod
spec:
  containers:
   - name: web-server
     image: nginx
     volumeMounts:
       - name: mypvc
         mountPath: /var/lib/www/html
  volumes:
   - name: mypvc
     persistentVolumeClaim:
       claimName: rbd-pvc
       readOnly: false
|
验证
1
2
3
4
5
|
➜  ~ kubectl exec rbd-demo-pod -- df -ah
Filesystem                 Size  Used Avail Use% Mounted on
...
/dev/rbd0                  976M  2.6M  958M   1% /var/lib/www/html
...
|
1
2
3
|
➜  ~ kubectl get pvc
NAME      STATUS   VOLUME                                     CAPACITY   ACCESS MODES   STORAGECLASS      AGE
rbd-pvc   Bound    pvc-4ce438e6-fcfe-444a-a491-ab185b9baed6   1Gi        RWO            rook-ceph-block   37m
|