工作中使用LDAP作统一认证的系统不少,但从来没亲自搭建过Server,最近因为新项目的需要,得亲自搭一套出来,本以为很容易呢,结果被无情打脸。经过一番搜索,发现网上的文章不是已经过时就是相互复制,各种错误,真能参考下来能完整搭建出来的几乎没有。
那就能只能自己来填坑了,本篇文章会详细节录搭建过程,而且会详细告诉你做每一步操作的作用。
软件安装
yum install -y openldap openldap-servers openldap-clients
1
2
3
|
[root@test01 ~]# rpm -qa |grep openldap
openldap-servers-2.4.44-21.el7_6.x86_64
openldap-2.4.44-21.el7_6.x86_64
|
启动服务
先复制一份Berkeley DB配置文件到/var/lib/ldap目录,不然服务启动时会报一个警告openvpn slapd[26303]: hdb_db_open: warning - no DB_CONFIG file found in directory /var/lib/ldap:。
1
|
cp /usr/share/openldap-servers/DB_CONFIG.example /var/lib/ldap/DB_CONFIG
|
启动服务
1
2
|
systemctl start slapd
systemctl enable slapd
|
配置
这里是重点,在过去OpenLDAP 的配置都是静态,配置全部写在slapd.conf文件里,如需修改配置就要先修改slapd.conf再重启服务让配置生效。这对配置较大的用户来说,每次修改配置都要重启服务是无法接受的。
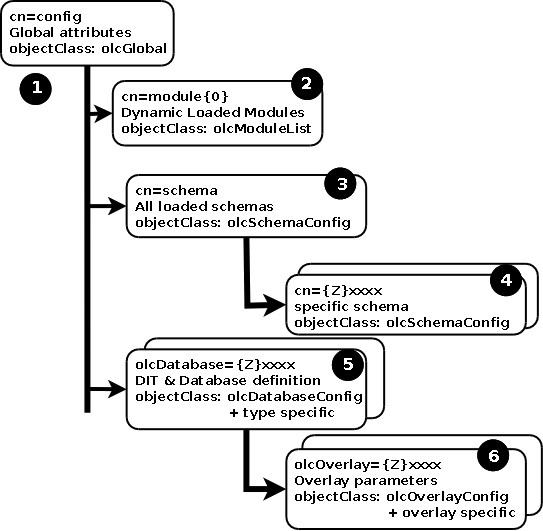
所以从OpenLDAP 2.3版本开始引入了一项可选的新功能,该功能使用称为cn=config的DIT(directory information tree) 条目保存配置,可以动态调整配置,不需要中断服务。
至于具体从哪个版本默认开启这一功能,网上有人提到是从``OpenLDAP 2.4.23版本开始的,但我们没有找到出处,不过这不重要,反正我当前安装的2.4.44`版本肯定默认是启用了。
Historically OpenLDAP has been statically configured, that is, to make a change to the configuration the slapd.conf file was modified and slapd stopped and started. In the case of larger users this could take a considerable period of time and had become increasingly unacceptable as an operational method. OpenLDAP version 2.3 introduced an optional new feature whereby configuration may be performed at run-time using a DIT entry called cn=config. The feature is known by a varied and confusing number of terms including on-line configuration (OLC) (our favorite), zero down-time configuration, cn=config and slapd.d configuration. First,
它的目录结构

关于这一块的更多详细信息可以看下这里。我的理解就是把配置也换成LDAP的形式来存储,有点类似开发语言中自举的意思。
来看下我们当前的配置目录结构:
 1
 2
 3
 4
 5
 6
 7
 8
 9
10
11
12
13
14
|
[root@test01 openldap]# ldapsearch -Q -LLL -Y EXTERNAL -H ldapi:/// -b cn=config dn
dn: cn=config

dn: cn=schema,cn=config

dn: cn={0}core,cn=schema,cn=config

dn: olcDatabase={-1}frontend,cn=config

dn: olcDatabase={0}config,cn=config

dn: olcDatabase={1}monitor,cn=config

dn: olcDatabase={2}hdb,cn=config
|
注意留意下上边每个dn,其中olcDatabase={2}hdb,cn=config dn最中要,接下的配置会用到,看看是不是和我的一样,不一样的话在修改对应配置时要做相应的修改。
下边正式开始我们的配置。
再开始之前我们先创建一个工作目录用来存放配置文件
1
|
mkdir -p /root/openldap
|
1.导入schema
先入schema不然下边在ldapadd或ldapmodify时会报错,
1
2
|
ldap_add: Undefined attribute type (17)
	additional info: homeDirectory: attribute type undefined
|
1
2
3
4
5
6
|
SASL/EXTERNAL authentication started
SASL username: gidNumber=0+uidNumber=0,cn=peercred,cn=external,cn=auth
SASL SSF: 0
modifying entry "olcDatabase={2}hdb,cn=config"
ldap_modify: Other (e.g., implementation specific) error (80)
	additional info: <olcAccess> handler exited with 1
|
所以干脆全部导入:
1
|
ls /etc/openldap/schema/*.ldif | while read f; do ldapadd -Y EXTERNAL -H ldapi:/// -f $f; done
|
截止到这里对openldap的配置基本完成,但数据库还为空,接下来我们会来填充一些数据。
2.修改RootDN和RootPW
我们先查看下当前的RootDN和RootPW
1
2
3
|
[root@openvpn ~]# ldapsearch -H ldapi:// -LLL -Q -Y EXTERNAL -b "cn=config" "(olcRootDN=*)" dn olcRootDN olcRootPW
dn: olcDatabase={2}hdb,cn=config
olcRootDN: cn=Manager,dc=my-domain,dc=com
|
默认安装后RootDN为cn=Manager,dc=my-domain,dc=com,RootPW为空,这俩分别相当于用户名和密码。
开始准备LDIF(LDAP Data Interchange Format) 文件,
 1
 2
 3
 4
 5
 6
 7
 8
 9
10
11
|
LDAP_Root_DN='cn=root,dc=dianduidian,dc=com'
LDAP_Root_PW=`slappasswd -s root@pw`
cat <<EOF > /root/openldap/rootpw.ldif
dn: olcDatabase={2}hdb,cn=config
changetype: modify
add: olcRootPW
olcRootPW: ${LDAP_Root_PW}
-
replace: olcRootDN
olcRootDN: ${LDAP_Root_DN}
EOF
|
执行修改,使配置生效
ldapadd -Y EXTERNAL -H ldapi:/// -f /root/openldap/rootpw.ldif
1
2
3
4
5
|
[root@openvpn openldap]# ldapadd -Y EXTERNAL -H ldapi:/// -f rootpw.ldif
SASL/EXTERNAL authentication started
SASL username: gidNumber=0+uidNumber=0,cn=peercred,cn=external,cn=auth
SASL SSF: 0
modifying entry "olcDatabase={2}hdb,cn=config"
|
验证是否生效
1
2
3
4
|
[root@openvpn openldap]# ldapsearch -H ldapi:// -LLL -Q -Y EXTERNAL -b "cn=config" "(olcRootDN=*)" dn olcRootDN olcRootPW
dn: olcDatabase={2}hdb,cn=config
olcRootPW: {SSHA}vPDSZsRa2cmmEmzPyqPCGFZPZgBCAyhl
olcRootDN: cn=root,dc=dianduidian,dc=com
|
3.修改Base DN
将默认dc=my-domain,dc=com替换成自己的DN。
 1
 2
 3
 4
 5
 6
 7
 8
 9
10
11
12
13
14
15
16
|
LDAP_Root_DN='cn=root,dc=dianduidian,dc=com'
#Base DN
LDAP_BASE_DN='dc=dianduidian,dc=com'
cat <<EOF > /root/openldap/base.ldif
dn: olcDatabase={1}monitor,cn=config
changetype: modify
replace: olcAccess
olcAccess: {0}to * by dn.base="gidNumber=0+uidNumber=0,cn=peercred,cn=external
 ,cn=auth" read by dn.base="${LDAP_Root_DN}" read by * none


dn: olcDatabase={2}hdb,cn=config
changetype: modify
replace: olcSuffix
olcSuffix: ${LDAP_BASE_DN}
EOF
|
执行修改,使配置生效
ldapadd -Y EXTERNAL -H ldapi:/// -f /root/openldap/base.ldif
1
2
3
4
5
6
7
|
[root@openvpn openldap]# ldapadd -Y EXTERNAL -H ldapi:/// -f /root/openldap/base.ldif
SASL/EXTERNAL authentication started
SASL username: gidNumber=0+uidNumber=0,cn=peercred,cn=external,cn=auth
SASL SSF: 0
modifying entry "olcDatabase={1}monitor,cn=config"

modifying entry "olcDatabase={2}hdb,cn=config"
|
4.权限控制
1
2
3
4
5
6
7
8
|
LDAP_BASE_DN='dc=dianduidian,dc=com'
cat <<EOF > acl.ldif
dn: olcDatabase={2}hdb,cn=config
changetype: modify
add: olcAccess
olcAccess: to attrs=userPassword,shadowLastChange by self write by dn="cn=root,${LDAP_BASE_DN}" write by anonymous auth by * none
olcAccess: to * by self read by dn="cn=root,${LDAP_BASE_DN}" write by * none
EOF
|
1
2
3
4
5
|
[root@openvpn openldap]# ldapmodify -Y EXTERNAL -H ldapi:/// -f acl.ldif
SASL/EXTERNAL authentication started
SASL username: gidNumber=0+uidNumber=0,cn=peercred,cn=external,cn=auth
SASL SSF: 0
modifying entry "olcDatabase={2}hdb,cn=config"
|
- 只允许自己和管理员修改密码,禁止匿名bind
- 自己只能查看自己的信息,管理员有所有权限
5. 启用memberOf overlay
 1
 2
 3
 4
 5
 6
 7
 8
 9
10
11
12
13
14
15
16
17
18
19
20
|
cat <<EOF > /root/openldap/memberof.ldif
# Load memberof module
dn: cn=module{0},cn=config
objectClass: olcModuleList
objectclass: top
olcModuleLoad: memberof

# Backend memberOf overlay
dn: olcOverlay={0}memberof,olcDatabase={2}hdb,cn=config
objectClass: olcOverlayConfig
objectClass: olcMemberOf
olcOverlay: {0}memberof
olcMemberOfDangling: ignore
olcMemberOfRefInt: TRUE
olcMemberOfGroupOC: groupOfNames
olcMemberOfMemberAD: member
#olcMemberOfGroupOC: groupOfUniqueNames
#olcMemberOfMemberAD: uniqueMember
olcMemberOfMemberOfAD: memberOf
EOF
|
关于上边参数的具体作用可以看这里,其中olcMemberOfGroupOC和groupOfUniqueNames俩参数很关键决定是否能配置成功。
| 成员 |
所属组 |
| member |
groupOfNames |
| uniqueMember |
groupOfUniqueNames |
这俩的参数可以选择[groupOfNames和member]或[groupOfUniqueNames和uniqueMember]其中任意一组合,并非网上有人说的Centos 7较Centos 6有改变。
查了下资料比较推荐groupOfNames和member组合,大家根据喜好自行选择,我自己用的是groupOfNames和member组合。
The LDAP clients also support group entries that use the groupOfUniqueNames object class and the uniqueMember attribute. However, using this object class and attribute is not recommended.
执行修改,使配置生效
1
2
3
4
|
[root@openvpn openldap]# ldapadd -Q -Y EXTERNAL -H ldapi:/// -f memberof.ldif
adding new entry "cn=module{0},cn=config"

adding new entry "olcOverlay={0}memberof,olcDatabase={2}hdb,cn=config"
|
验证memberof模块已经加载
1
2
|
[root@openvpn openldap]# slapcat -n 0 | grep olcModuleLoad
olcModuleLoad: {0}memberof
|
这里还要多叨叨一嘴,网上很多教程都提到还要加载refint模块并做相应配置,类似这样的配置
 1
 2
 3
 4
 5
 6
 7
 8
 9
10
11
|
dn: cn=module{0},cn=config
add: olcmoduleload
olcmoduleload: refint

dn: olcOverlay=refint,olcDatabase={2}hdb,cn=config
objectClass: olcConfig
objectClass: olcOverlayConfig
objectClass: olcRefintConfig
objectClass: top
olcOverlay: refint
olcRefintAttribute: memberof uniqueMember  manager owner
|
其实这不是必须的,因为memberof已经自带refint功能,只需要olcMemberOfRefInt设置为TRUE就开启refint。
refint 是Referential Integrity的缩写,它的作用有点类型于数据库中外键的作用。举例来说,如果refint属性设置为manager,且记录值为cn=root,dc=dianduidian,dc=com,这时删除cn=root,dc=dianduidian,dc=com这一记录将会触发对库有所有含有manager属性记录的搜索并删除。
创建组织结构
 1
 2
 3
 4
 5
 6
 7
 8
 9
10
11
12
13
14
15
16
17
|
#Base DN
LDAP_BASE_DN='dc=dianduidian,dc=com'
cat <<EOF > /root/openldap/organization.ldif
dn: ${LDAP_BASE_DN}
objectClass: top
objectClass: dcObject
objectClass: organization
o: Xnile

dn: ou=people,${LDAP_BASE_DN}
objectClass: organizationalUnit
ou: People

dn: ou=group,${LDAP_BASE_DN}
objectClass: organizationalUnit
ou: Group
EOF
|
1
|
ldapadd -x -D cn=root,dc=dianduidian,dc=com -W -f /root/openldap/organization.ldif
|
测试memberOf
-
添加用户
 1
 2
 3
 4
 5
 6
 7
 8
 9
10
11
12
13
14
15
16
17
18
19
20
21
22
23
|
#密码
LDAP_USER_PW=`slappasswd -s u@pw`
#Base DN
LDAP_BASE_DN='dc=dianduidian,dc=com'
cat <<EOF > /root/openldap/user.ldif
dn: cn=xnile,ou=people,${LDAP_BASE_DN}
cn: xnile
givenName: xnile
sn: xnile
uid: xnile
uidNumber: 10001
gidNumber: 10001
homeDirectory: /home/xnile
mail: xnile@dianduidian.com
objectClass: top
objectClass: posixAccount
objectClass: shadowAccount
objectClass: inetOrgPerson
objectClass: organizationalPerson
objectClass: person
loginShell: /bin/bash
userPassword: ${LDAP_USER_PW}
EOF
|
1
2
3
|
[root@openvpn openldap]# ldapadd -x -D cn=root,dc=dianduidian,dc=com -W -f /root/openldap/user.ldif
Enter LDAP Password:
adding new entry "cn=xnile,ou=people,dc=dianduidian,dc=com"
|
-
添加组
1
2
3
4
5
6
7
8
9
|
#Base DN
LDAP_BASE_DN='dc=dianduidian,dc=com'
cat <<EOF > /root/openldap/group.ldif
dn: cn=devops,ou=group,${LDAP_BASE_DN}
objectClass: groupOfnames
cn: devops
description: All users
member: cn=xnile,ou=people,${LDAP_BASE_DN}
EOF
|
1
2
3
|
[root@openvpn openldap]# ldapadd -x -D cn=root,dc=dianduidian,dc=com -W -f /root/openldap/group.ldif
Enter LDAP Password:
adding new entry "cn=devops,ou=group,dc=dianduidian,dc=com"
|
-
验证
1
2
3
|
[root@openvpn openldap]# ldapsearch -x -LLL -D cn=root,dc=dianduidian,dc=com -w root@pw -b cn=xnile,ou=people,dc=dianduidian,dc=com dn memberof
dn: cn=xnile,ou=people,dc=dianduidian,dc=com
memberOf: cn=devops,ou=group,dc=dianduidian,dc=com
|
-
删除cn=xnile,ou=people,dc=dianduidian,dc=com Entry,对应cn=devops,ou=group,dc=dianduidian,dc=com Entry中的member条目也会删除,这就是olcMemberOfRefInt: TRUE 参数的作用。这里就省略演示过程了。
创建一个只读用户
其他系统要想接入LDAP需要有一个账号来连接LDAP库获取库的信息,为了安全考虑一般不太推荐直接使用RootDN和RootPW而应该单独创建一个只读的用户专门用来做三方系统接入。
-
添加用户
 1
 2
 3
 4
 5
 6
 7
 8
 9
10
11
12
|
#密码
LDAP_READONLY_USER_PW=`slappasswd -s u@pw`
#Base DN
LDAP_BASE_DN='dc=dianduidian,dc=com'
cat <<EOF > /root/openldap/readOnly.ldif
dn: cn=readonly,${LDAP_BASE_DN}
cn: readonly
objectClass: simpleSecurityObject
objectClass: organizationalRole
description: LDAP read only user
userPassword: ${LDAP_READONLY_USER_PW}
EOF
|
1
2
|
ldapadd -x -D cn=root,dc=dianduidian,dc=com -w root@pw -f /root/openldap/readOnly.ldif
adding new entry "cn=readonly,dc=dianduidian,dc=com"
|
-
设置权限
 1
 2
 3
 4
 5
 6
 7
 8
 9
10
|
LDAP_BASE_DN='dc=dianduidian,dc=com'
cat <<EOF > readonly-user-acl.ldif
dn: olcDatabase={2}hdb,cn=config
changetype: modify
delete: olcAccess
-
add: olcAccess
olcAccess: to attrs=userPassword,shadowLastChange by self write by dn="cn=admin,${LDAP_BASE_DN}" write by anonymous auth by * none
olcAccess: to * by self read by dn="cn=admin,${LDAP_BASE_DN}" write by dn="cn=readonly,${LDAP_BASE_DN}" read by * none
EOF
|
1
2
3
4
5
|
[root@openvpn openldap]# ldapmodify -Y EXTERNAL -H ldapi:/// -f readonly-user-acl.ldif
SASL/EXTERNAL authentication started
SASL username: gidNumber=0+uidNumber=0,cn=peercred,cn=external,cn=auth
SASL SSF: 0
modifying entry "olcDatabase={2}hdb,cn=config"
|
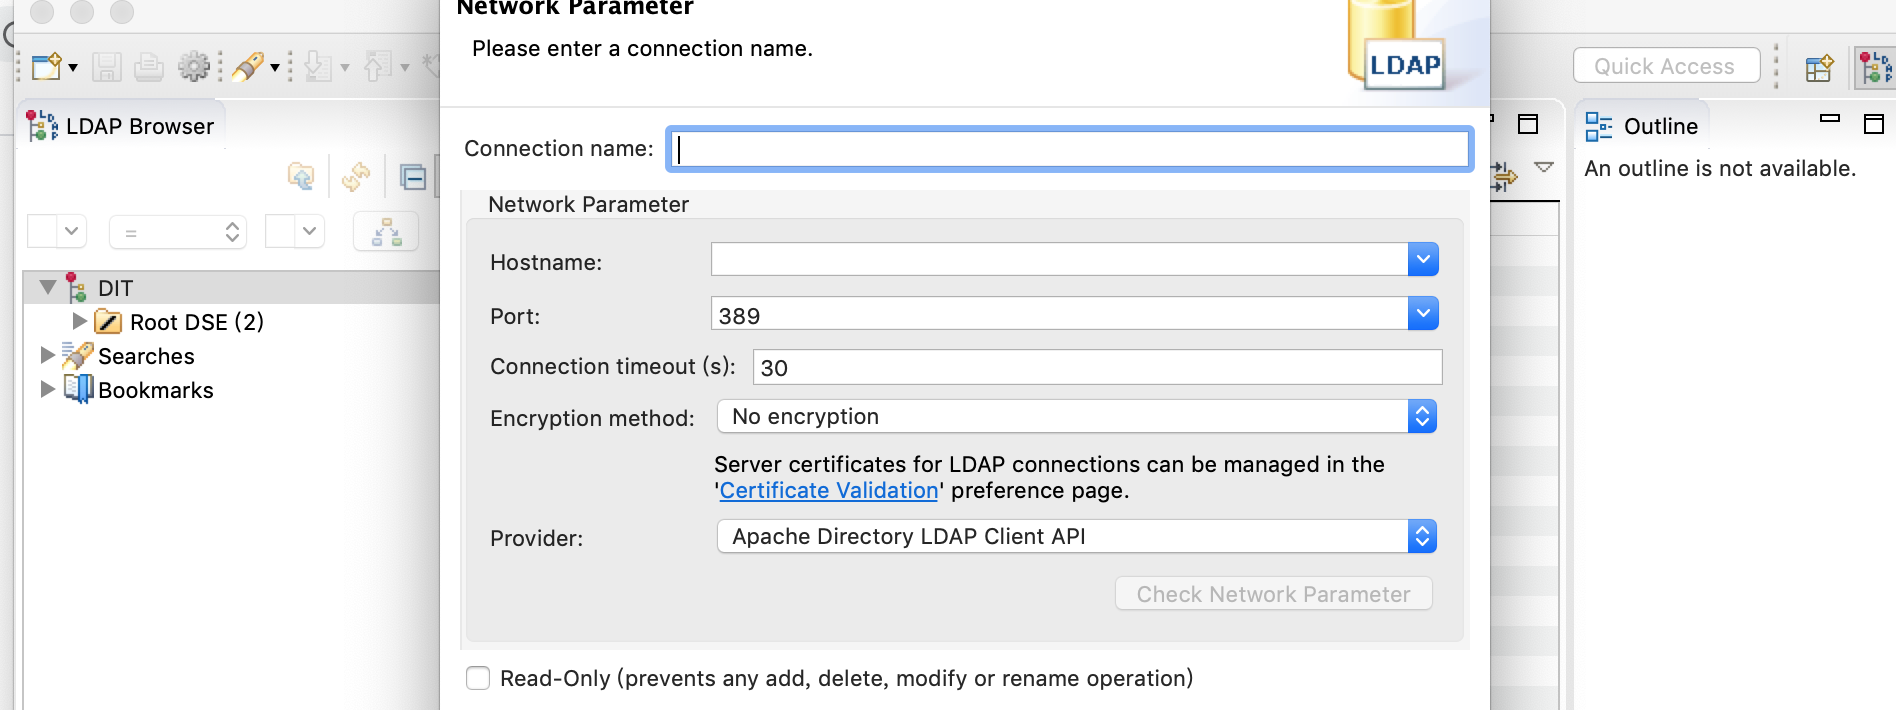
客户端
LDAP客户端选择有,我使用的是Apache Directory Studio。
下载地址:https://directory.apache.org/studio/downloads.html

调试
其它
- 通过monitor backend 获取slapd状态
1
2
3
4
5
6
7
8
9
10
11
12
13
14
15
16
17
18
19
20
21
22
23
24
25
26
27
28
29
30
31
32
33
|
[root@openvpn openldap]# ldapsearch -x -D 'cn=root,dc=dianduidian,dc=com' -w root@pw -b 'cn=Monitor' -s base '(objectClass=*)' '*' '+'
# extended LDIF
#
# LDAPv3
# base <cn=Monitor> with scope baseObject
# filter: (objectClass=*)
# requesting: * +
#
# Monitor
dn: cn=Monitor
objectClass: monitorServer
structuralObjectClass: monitorServer
cn: Monitor
creatorsName:
modifiersName:
createTimestamp: 20200405000230Z
modifyTimestamp: 20200405000230Z
description: This subtree contains monitoring/managing objects.
description: This object contains information about this server.
description: Most of the information is held in operational attributes, which
must be explicitly requested.
monitoredInfo: OpenLDAP: slapd 2.4.44 (Jan 29 2019 17:42:45)
entryDN: cn=Monitor
subschemaSubentry: cn=Subschema
hasSubordinates: TRUE
# search result
search: 2
result: 0 Success
# numResponses: 2
# numEntries: 1
|
 1
 2
 3
 4
 5
 6
 7
 8
 9
10
11
12
13
14
15
16
17
18
19
20
21
22
23
24
25
26
27
28
29
30
31
32
33
34
|
[root@openvpn openldap]# ldapsearch  -Y EXTERNAL -H ldapi:/// -b cn=config 'olcDatabase={2}hdb'
SASL/EXTERNAL authentication started
SASL username: gidNumber=0+uidNumber=0,cn=peercred,cn=external,cn=auth
SASL SSF: 0
# extended LDIF
#
# LDAPv3
# base <cn=config> with scope subtree
# filter: olcDatabase={2}hdb
# requesting: ALL
#

# {2}hdb, config
dn: olcDatabase={2}hdb,cn=config
objectClass: olcDatabaseConfig
objectClass: olcHdbConfig
olcDatabase: {2}hdb
olcDbDirectory: /var/lib/ldap
olcSuffix: dc=dianduidian,dc=com
olcRootDN: cn=root,dc=dianduidian,dc=com
olcRootPW: {SSHA}vPDSZsRa2cmmEmzPyqPCGFZPZgBCAyhl
olcDbIndex: objectClass eq,pres
olcDbIndex: ou,cn,mail,surname,givenname eq,pres,sub
olcAccess: {0}to attrs=userPassword,shadowLastChange by self write by dn="cn=r
 oot,dc=dianduidian,dc=com" write by anonymous auth by * none
olcAccess: {1}to * by self read by dn="cn=root,dc=dianduidian,dc=com" write by d
 n="cn=readonly,dc=dianduidian,dc=com" read by * none

# search result
search: 2
result: 0 Success

# numResponses: 2
# numEntries: 1
|
-
使用ldapvi 命令更方便的修改配置
1
|
ldapvi -h ldapi:// -Y EXTERNAL -b cn=config
|
参考
https://www.cnblogs.com/kevingrace/p/5773974.html
https://www.zytrax.com/books/ldap/
https://www.openldap.org/software//man.cgi?query=LDIF&sektion=5&apropos=0&manpath=OpenLDAP+2.4-Release
https://www.digitalocean.com/community/tutorials/how-to-change-account-passwords-on-an-openldap-server
https://www.openldap.org/doc/admin24/monitoringslapd.html
https://tylersguides.com/guides/openldap-memberof-overlay/
https://www.openldap.org/software/man.cgi?query=slapo-memberof&sektion=5&apropos=0&manpath=OpenLDAP+2.4-Release
https://github.com/osixia/docker-openldap
https://www.systutorials.com/docs/linux/man/5-slapo-refint/
https://github.com/osixia/docker-openldap/issues/304

