CNI概览
Container Networking Interface(CNI)提供了一种linux的应用容器的插件化网络解决方案。最初是由rkt Networking Proposal(CoreOS)发展而来。也就是说,CNI本身并不完全针对docker的容器,而是提供一种普适的容器网络解决方案。他的模型只涉及两个概念:
- 容器(container) : 容器是拥有独立linux网络命名空间的独立单元。比如rkt/docker创建出来的容器。
- 网络(network): 网络指代了可以相互联系的一组实体。这些实体拥有各自独立唯一的ip。这些实体可以是容器,是物理机,或者其他网络设备(比如路由器)等。
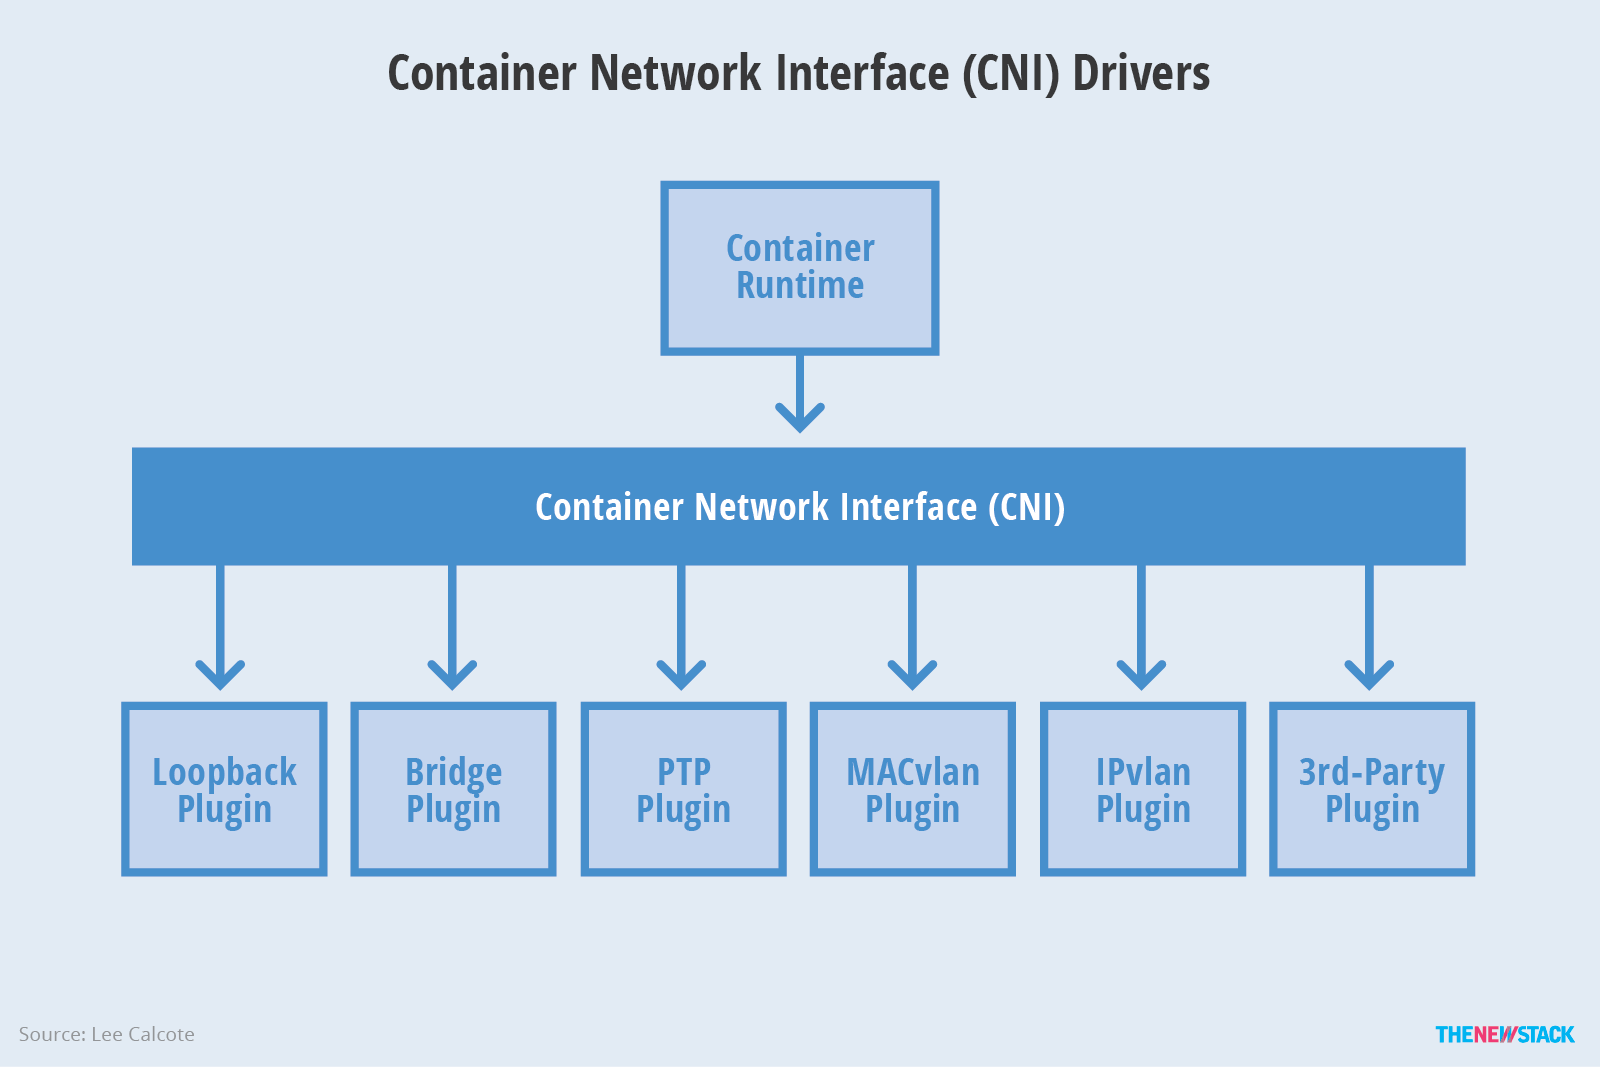
CNI是Kubernetes网络插件的基础。其基本思想为:Container Runtime在创建容器时,先创建好network namespace,然后调用CNI插件为这个netns配置网络,其后再启动容器内的进程。
CNI插件包括两部分:
CNI Plugin负责给容器配置网络,它包括两个基本的接口
- 配置网络:
AddNetwork(net NetworkConfig, rt RuntimeConf) (types.Result, error)
- 清理网络:
DelNetwork(net NetworkConfig, rt RuntimeConf) error
IPAM Plugin负责给容器分配IP地址,主要实现包括host-local和dhcp。
Kubernetes Pod 中的其他容器都是Pod所属pause容器的网络,创建过程为:
kubelet 先创建pause容器生成network namespace- 调用网络
CNI driver
CNI driver 根据配置调用具体的cni 插件cni 插件给pause 容器配置网络pod 中其他的容器都使用 pause 容器的网络
为了加深理解我们选择其中的bridge插件来演示下CNI的工作流程。
环境准备:
Centos7
 1
 2
 3
 4
 5
 6
 7
 8
 9
10
11
|
[root@xnile01 ~]# cat /etc/redhat-release
CentOS Linux release 7.3.1611 (Core)
[root@xnile01 ~]# ip a
1: lo: <LOOPBACK,UP,LOWER_UP> mtu 65536 qdisc noqueue state UNKNOWN qlen 1
    link/loopback 00:00:00:00:00:00 brd 00:00:00:00:00:00
    inet 127.0.0.1/8 scope host lo
       valid_lft forever preferred_lft forever
2: eth0: <BROADCAST,MULTICAST,UP,LOWER_UP> mtu 1500 qdisc pfifo_fast state UP qlen 1000
    link/ether 52:54:00:a7:9f:a0 brd ff:ff:ff:ff:ff:ff
    inet 192.168.122.94/24 brd 192.168.122.255 scope global eth0
       valid_lft forever preferred_lft forever
|
下载CNI二进制包:
注意一下CNI v0.6.0以后的版本,Plugins从主代码中独立出来了,这里为了简单我们就不下载最新的包了。
Important: the plugins have been separated to a separate repository. You should update any build scripts accordingly. This repository contains only the golang implementation of the spec, for use in plugins and runtimes.
 1
 2
 3
 4
 5
 6
 7
 8
 9
10
11
12
13
14
15
16
17
|
[root@xnile01 ~]# mkdir cni
[root@xnile01 ~]# cd cni/
[root@xnile01 cni]# curl -s -L https://github.com/containernetworking/cni/releases/download/v0.5.2/cni-amd64-v0.5.2.tgz|tar zxvf -
./
./macvlan
./dhcp
./loopback
./ptp
./ipvlan
./bridge
./tuning
./noop
./host-local
./cnitool
./flannel
[root@xnile01 cni]# ls
bridge  cnitool  dhcp  flannel  host-local  ipvlan  loopback  macvlan  noop  ptp  tuning
|
准备CNI配置文件
所有CNI插件均支持通过环境变量和标准输入传入参数
1
2
|
#安装jq命令,用来格式化配置文件,方法查看
yum install epel-release && yum install -y jq
|
1
|
[root@xnile01 cni]# echo '{"cniVersion": "0.3.1","name": "mybridge","type": "bridge","bridge": "cni_br0","isGateway": true,"ipMasq": true,"ipam": {"type": "host-local","subnet": "10.0.1.0/24","routes": [{ "dst": "0.0.0.0/0" }],"dataDir": "/tmp/container-ipam-state"}}'|jq '.' > mybridge.conf
|
查看配置:cat mybridge.conf
 1
 2
 3
 4
 5
 6
 7
 8
 9
10
11
12
13
14
15
16
17
18
|
{
  "cniVersion": "0.3.1",
  "name": "mybridge",
  "type": "bridge",
  "bridge": "cni_br0",
  "isGateway": true,
  "ipMasq": true,
  "ipam": {
    "type": "host-local",
    "subnet": "10.0.1.0/24",
    "routes": [
      {
        "dst": "0.0.0.0/0"
      }
    ],
    "dataDir": "/tmp/container-ipam-state"
  }
}
|
创建Network Namespace:testing
1
2
3
|
[root@xnile01 cni]# ip netns add testing
[root@xnile01 cni]# ip netns ls
testing
|
添加网络接口到容器中
 1
 2
 3
 4
 5
 6
 7
 8
 9
10
11
12
13
14
15
16
17
18
19
20
21
22
23
24
25
26
27
28
29
30
31
32
|
[root@xnile01 cni]# CNI_COMMAND=ADD CNI_CONTAINERID=testing CNI_NETNS=/var/run/netns/testing CNI_IFNAME=em1 CNI_PATH=`pwd` ./bridge < mybridge.conf
{
    "interfaces": [
        {
            "name": "cni_br0",
            "mac": "0a:58:0a:00:01:01"
        },
        {
            "name": "vethcd09860b",
            "mac": "7a:0e:6e:61:5c:cb"
        },
        {
            "name": "em1",
            "mac": "0a:58:0a:00:01:02",
            "sandbox": "/var/run/netns/testing"
        }
    ],
    "ips": [
        {
            "version": "4",
            "interface": 2,
            "address": "10.0.1.2/24",
            "gateway": "10.0.1.1"
        }
    ],
    "routes": [
        {
            "dst": "0.0.0.0/0"
        }
    ],
    "dns": {}
}
|
查看宿主机ip
 1
 2
 3
 4
 5
 6
 7
 8
 9
10
11
12
13
14
15
|
[root@xnile01 cni]# ip a
1: lo: <LOOPBACK,UP,LOWER_UP> mtu 65536 qdisc noqueue state UNKNOWN qlen 1
    link/loopback 00:00:00:00:00:00 brd 00:00:00:00:00:00
    inet 127.0.0.1/8 scope host lo
       valid_lft forever preferred_lft forever
2: eth0: <BROADCAST,MULTICAST,UP,LOWER_UP> mtu 1500 qdisc pfifo_fast state UP qlen 1000
    link/ether 52:54:00:a7:9f:a0 brd ff:ff:ff:ff:ff:ff
    inet 192.168.122.94/24 brd 192.168.122.255 scope global eth0
       valid_lft forever preferred_lft forever
5: cni_br0: <BROADCAST,MULTICAST,UP,LOWER_UP> mtu 1500 qdisc noqueue state UP qlen 1000
    link/ether 0a:58:0a:00:01:01 brd ff:ff:ff:ff:ff:ff
    inet 10.0.1.1/24 scope global cni_br0
       valid_lft forever preferred_lft forever
6: vethcd09860b@if7: <BROADCAST,MULTICAST,UP,LOWER_UP> mtu 1500 qdisc noqueue master cni_br0 state UP
    link/ether 7a:0e:6e:61:5c:cb brd ff:ff:ff:ff:ff:ff link-netnsid 0
|
查看网桥
1
2
3
|
[root@xnile01 cni]# brctl show
bridge name	bridge id		STP enabled	interfaces
cni_br0		8000.0a580a000101	no		vethcd09860b
|
查看iptables
1
2
3
4
|
[root@xnile01 cni]# iptables-save | grep mybridge
-A POSTROUTING -s 10.0.1.0/24 -m comment --comment "name: \"mybridge\" id: \"testing\"" -j CNI-d70f839124355844baf2fb74
-A CNI-d70f839124355844baf2fb74 -d 10.0.1.0/24 -m comment --comment "name: \"mybridge\" id: \"testing\"" -j ACCEPT
-A CNI-d70f839124355844baf2fb74 ! -d 224.0.0.0/4 -m comment --comment "name: \"mybridge\" id: \"testing\"" -j MASQUERADE
|
查看container-ipam-state
1
2
3
4
5
6
7
8
|
[root@xnile01 container-ipam-state]# cd /tmp/container-ipam-state/
[root@xnile01 container-ipam-state]# tree -r
.
└── mybridge
    └── last_reserved_ip

1 directory, 1 file
[root@xnile01 container-ipam-state]#
|
验证容器网络是否正常
说明一下,这里虽然我们没有起Container,但是条件已经具备,为了便于说明这里我们把它看成是在容器里。关于Docker如何使用CNI可以看一下我的这一篇文章 Docker如何使用CNI 。
1
2
3
4
5
6
7
|
[root@xnile01 cni]# ip -n testing a
1: lo: <LOOPBACK> mtu 65536 qdisc noop state DOWN qlen 1
    link/loopback 00:00:00:00:00:00 brd 00:00:00:00:00:00
7: em1@if6: <BROADCAST,MULTICAST,UP,LOWER_UP> mtu 1500 qdisc noqueue state UP
    link/ether 0a:58:0a:00:01:02 brd ff:ff:ff:ff:ff:ff link-netnsid 0
    inet 10.0.1.2/24 scope global em1
       valid_lft forever preferred_lft forever
|
1
2
3
|
[root@xnile01 cni]# ip netns exec testing ip route
default via 10.0.1.1 dev em1
10.0.1.0/24 dev em1  proto kernel  scope link  src 10.0.1.2
|
1
2
3
4
5
6
7
|
[root@xnile01 cni]# ip netns exec testing ping -c 1 www.baidu.com
PING www.a.shifen.com (220.181.38.149) 56(84) bytes of data.
64 bytes from 220.181.38.149 (220.181.38.149): icmp_seq=1 ttl=47 time=5.01 ms

--- www.a.shifen.com ping statistics ---
1 packets transmitted, 1 received, 0% packet loss, time 0ms
rtt min/avg/max/mdev = 5.014/5.014/5.014/0.000 ms
|
删除
删除容器网卡
1
|
CNI_COMMAND=DEL CNI_CONTAINERID=testing CNI_NETNS=/var/run/netns/testing CNI_IFNAME=em1 CNI_PATH=`pwd` ./bridge < mybridge.conf
|
容器里的em1网卡已被删除
1
2
3
|
[root@xnile01 cni]# ip netns exec testing ip a
1: lo: <LOOPBACK> mtu 65536 qdisc noop state DOWN qlen 1
    link/loopback 00:00:00:00:00:00 brd 00:00:00:00:00:00
|
删除桥接
1
2
|
[root@xnile01 cni]# ip link set cni_br0 down
[root@xnile01 cni]# brctl delbr cni_br0
|
删除network namespace
1
|
[root@xnile01 cni]# ip netns delete testing
|
参考
https://github.com/containernetworking/cni/tree/master/cnitool
https://feisky.gitbooks.io/sdn/container/cni/
https://github.com/containernetworking/cni/blob/master/SPEC.md
https://xuxinkun.github.io/2016/07/22/cni-cnm/
https://www.dasblinkenlichten.com/understanding-cni-container-networking-interface/